


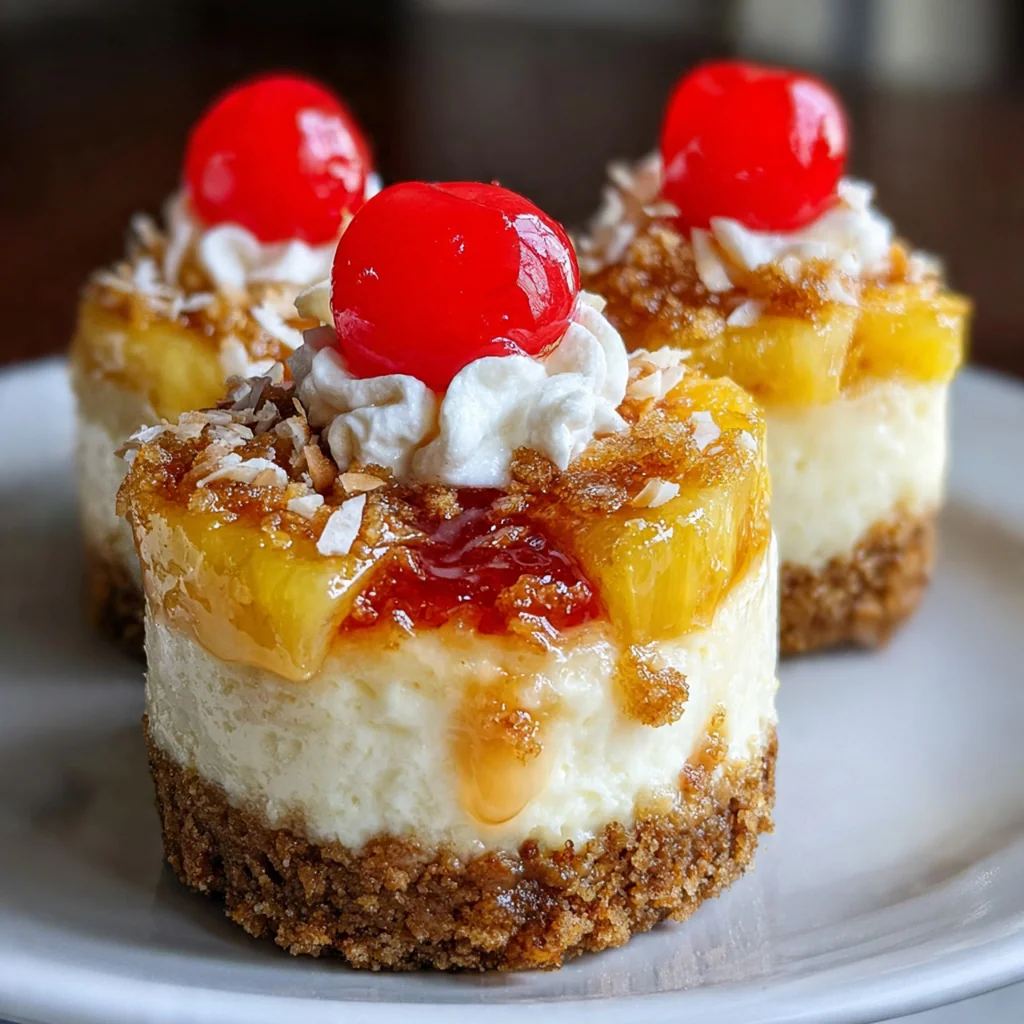
Mini Pineapple Upside Down Cheesecakes bring together two beloved desserts in one irresistible bite. These individual treats feature a caramelized pineapple bottom that transforms into a glossy, beautiful top when inverted. A creamy cheesecake layer sits on a buttery graham cracker crust, making each serving a perfect portion. I love how this recipe captures the nostalgic flavor of classic pineapple upside-down cake while adding rich, tangy cheesecake texture. The individual format makes them ideal for dinner parties or date nights when you want something special without the hassle of slicing a whole cake.
Why You'll Love This Recipe
- Perfect individual portions – no slicing a whole cheesecake needed
- The caramelized pineapple top is stunning and requires no extra decoration
- Creamy, tangy cheesecake filling balanced with sweet, juicy pineapple
- Makes exactly 6 servings – great for small gatherings or date night
- Can be made a day ahead, making entertaining a breeze
Ingredients You’ll Need
- Unsalted butter: The key to both the caramel base and the crust, unsalted butter lets you control the saltiness perfectly while creating that rich, melt-in-your-mouth texture. I always use high-quality European-style butter for extra richness.
- Light brown sugar: This creates the deep, molasses-rich caramel that coats the pineapple. Pack it firmly into your measuring cup to ensure you get the right moisture level for that glossy, sticky topping.
- Pineapple rings: Canned rings in juice work beautifully here since they’re already the perfect tenderness. Reserve those precious two tablespoons of juice – it adds incredible tropical flavor to the cheesecake filling.
- Maraschino cherries: These bright red beauties add the classic pineapple upside-down cake look and a pop of sweet cherry flavor. Make sure to drain them well so they don’t bleed color into your batter.
- Graham cracker crumbs: You’ll need about 12 full sheets to get the perfect 1.5 cups. The crackers provide a slightly sweet, sturdy base that holds up to the creamy filling. I like to crush them myself for better texture control.
- Granulated sugar: Used in both the crust and the filling, this refined sugar balances the tangy cream cheese and the brown sugar’s molasses notes. You can slightly reduce it if your pineapple is very sweet.
- Cream cheese: Use full-fat block cream cheese, softened to room temperature – this is absolutely crucial for a smooth, lump-free filling. Let it sit out for at least an hour before you start mixing.
- Eggs: Room temperature eggs blend seamlessly into the batter without overmixing. Cold eggs can cause the batter to curdle, so plan ahead and set them out with your cream cheese.
- Sour cream: This adds a subtle tang and extra creaminess to the filling. Room temperature sour cream incorporates more easily, creating that velvety texture we’re after.
- Vanilla extract: Pure vanilla extract enhances all the other flavors without overpowering them. Imitation vanilla works in a pinch, but real vanilla makes these mini cheesecakes truly special.
- All-purpose flour: Just a tablespoon helps stabilize the cheesecake filling, preventing cracks and ensuring a smooth, set texture. It’s a tiny amount that makes a big difference in the final result.
- Whipped cream: Optional but highly recommended! A dollop of freshly whipped cream adds a light, airy contrast to the rich cheesecake and caramelized pineapple.
- Extra maraschino cherries: For garnish on top, these make the presentation pop and add extra sweet cherry flavor. Fresh mint leaves could be a lovely alternative too.
- Toasted coconut flakes: Optional garnish that adds tropical crunch and nutty flavor. Toast them yourself in a dry pan for the best aroma and texture.
How to Make It
Preheat and Prepare Pan:
Start by preheating your oven to 325°F (163°C). Place 6 paper or silicone cupcake liners inside a standard muffin tin. This recipe makes 6 generous mini cheesecakes, so you won’t need a jumbo tin. The liners are essential for easy removal later.
Create Caramel Base:
In a small bowl, stir together 1/2 cup melted butter and 1/3 cup brown sugar until completely smooth. Spoon about 2 teaspoons of this caramel mixture into the bottom of each cupcake liner, spreading it evenly across the base. This layer will become your beautiful glossy top after inversion.
Add Pineapple and Cherries:
Cut the pineapple rings into small pieces that will fit into the bottom of each liner. Place one piece of pineapple in the center of the caramel layer in each liner, then place a maraschino cherry on top of the pineapple. Set the muffin tin aside while you prepare the crust. The cherry should sit right in the center of the pineapple piece.
Make Graham Cracker Crust:
In a medium bowl, combine the graham cracker crumbs, 2 tablespoons granulated sugar, and 1/4 cup melted butter. Mix until the crumbs are evenly moistened and resemble wet sand. Press about 2 tablespoons of this mixture firmly into each cupcake liner, directly on top of the pineapple and cherry. Use a small glass or measuring cup to pack it down tightly – this creates a solid foundation.
Prepare Creamy Cheesecake Filling:
Using a hand mixer or stand mixer, beat the softened cream cheese and 1/2 cup granulated sugar on medium speed until completely smooth and creamy, about 2-3 minutes. Scrape down the sides of the bowl as needed. Room temperature cream cheese is non-negotiable here – it prevents lumps and ensures that silky texture.
Incorporate Eggs Carefully:
Add the eggs one at a time, beating on low speed just until incorporated after each addition. Don’t overmix! Overbeating eggs incorporates too much air, which can cause cracking. Stir in the sour cream, vanilla extract, reserved pineapple juice, and flour. Mix just until combined and smooth. The flour acts as a stabilizer.
Fill and Bake:
Divide the cheesecake batter evenly among the 6 muffin cups, pouring it over the crust layer. Fill each cup almost to the top, leaving just a tiny bit of room. Bake for 28-32 minutes, until the centers are set but still have a slight jiggle when you gently shake the pan. The edges should look slightly puffed and golden. Remember, they’ll continue cooking from residual heat.
Cool and Loosen:
Remove from the oven and let the cheesecakes cool in the pan for 10 minutes. Then, carefully run a small knife around the edge of each cheesecake to loosen it. This step is crucial for clean release – don’t skip it! The caramel will be sticky, so take your time.
Invert with Confidence:
Place a wire rack over the muffin tin. Invert the entire rack and tin together, then carefully lift the tin off. The cheesecakes should release with the pineapple side up. If any caramel sticks, gently scrape it out and place it back on top. Don’t panic if one sticks – the warm caramel is forgiving.
Chill to Set:
Let the mini cheesecakes cool completely at room temperature, then refrigerate for at least 2 hours (or up to overnight) before serving to allow them to fully set and develop flavor. This chilling time transforms them from good to absolutely incredible. The texture becomes more firm and the flavors meld together beautifully.
Serve and Enjoy:
Remove from the refrigerator about 15 minutes before serving to take the chill off slightly. Top with whipped cream and an extra cherry if desired. They’re delicious straight from the fridge or at room temperature, so you have flexibility depending on your preference.

You Must Know
- Room temperature ingredients are crucial for smooth filling
- Don’t overmix after adding eggs to prevent cracks
- That slight jiggle in the center means perfect doneness
- I learned the hard way that rushing the chilling time results in a softer texture that doesn…
Storage Tips
Store your mini cheesecakes covered in the refrigerator for up to 5 days. Keep them in the muffin tin with plastic wrap pressed directly on the surface to prevent drying out, or transfer to an airtight container. If you want to freeze them, wrap each cheesecake individually in plastic wrap, then place them in a freezer bag for up to 2 months. Thaw them in the refrigerator overnight rather than on the counter – this prevents condensation from making the tops soggy. When you’re ready to serve, you can even enjoy them frozen for a delightful ice cream-like treat!
Ingredient Substitutions
For a gluten-free version, simply swap the graham crackers for gluten-free graham-style cookies and use a gluten-free all-purpose flour blend instead of regular flour. The taste remains virtually identical. If you’re dairy-free, replace the butter with vegan butter sticks, use dairy-free cream cheese (Miyoko’s or Kite Hill work great), and swap the sour cream for dairy-free yogurt or coconut cream. The texture will be slightly different but still delicious. For a lower sugar option, you can use Swerve brown sugar substitute in the caramel layer and a sugar-free sweetener in the filling, though the caramel won’t be quite as glossy. If you don’t have maraschino cherries, fresh pitted cherries or even a small piece of glazed peach would work for that center garnish.
Serving Suggestions
These mini cheesecakes shine on their own, but they’re even better with a generous dollop of freshly whipped cream and a mint leaf for color. Serve them slightly chilled but not ice-cold – about 15 minutes out of the fridge is perfect. For a dinner party presentation, arrange them on a platter with fresh pineapple chunks and a dusting of toasted coconut. They pair beautifully with coffee, dessert wine, or even a cup of Earl Grey tea. For a fun twist, serve them alongside a scoop of vanilla bean ice cream or drizzle with a caramel sauce if you want to go over the top. Kids love them as special treats, and they’re elegant enough for adult gatherings too.
Cultural Context
These mini cheesecakes are a delightful fusion of classic American dessert traditions. The pineapple upside-down cake became iconic in the 1920s and 1930s when canned pineapple made tropical flavors accessible to home bakers across America. Cheesecake itself has deep roots in American cuisine, evolving from dense New York style to lighter, creamier versions. Combining these two beloved desserts into individual portions feels very modern, reflecting today’s preference for portable, portion-controlled treats. The caramelized fruit technique actually dates back to European traditions where sugar was used to preserve fruits, but the American adaptation with pineapple and maraschino cherries is uniquely mid-century. These mini versions represent how home cooks adapt retro classics for contemporary lifestyles – all the nostalgia, none of the fuss.
Pro Tips
- Let your cream cheese soften at room temperature for at least 2 hours
- Use a thin flexible knife for the cleanest edge release
- If caramel sticks, warm the tin bottom for 1 minute
- Don’t skip the pineapple juice in the filling – it’s the secret flavor
- I find placing the cream cheese near (not on) my preheating oven helps it soften faster when…
Frequently Asked Questions
Yes, fresh pineapple works beautifully! Cut it into rings about 1/4-inch thick. You’ll need to cook the fresh pineapple rings with brown sugar and butter first to get that caramelized texture before adding the cheesecake layer. Since canned pineapple comes pre-softened, fresh fruit requires this extra step.
Avoid overmixing the cheesecake batter once you add the eggs. Mix just until combined and smooth. Also, let them cool gradually in the oven with the door cracked for 10 minutes after baking. The tablespoon of flour in this recipe also helps stabilize the structure and prevents cracking.
Absolutely! For a different flavor twist, try vanilla wafer crumbs or crushed shortbread cookies instead of graham crackers. Both pair wonderfully with the pineapple and cream cheese flavors. Just maintain the same 1 1/2 cup measurement and keep the 2 tablespoons of granulated sugar for sweetness.
The edges should look set and slightly puffed, while the center still has a tiny bit of jiggle when you gently shake the pan. It will firm up as it cools. At 30 minutes baking time, check for this signature wobble – it should move like Jello, not liquid. This ensures perfect creamy texture.
Yes! These cheesecakes actually taste better after chilling for at least 4 hours or overnight. Store them covered in the refrigerator for up to 3 days. The flavors meld together beautifully, and the texture becomes even creamier. Just add the maraschino cherry right before serving for the freshest look.